Eye makeup is the most forgiving thing you can do to your face. Done badly, it looks like an accident. Done well, nobody can say what changed — they just notice you look awake, alert, a little more put-together. That’s the whole appeal, and it’s why the topic keeps coming up.
This guide gets you from “I smudge everything” to having a few looks you can do on autopilot. We’ll cover the basics of application, walk through the four styles people actually reach for — natural, smokey, colorful, and formal — show twenty examples, and list the tools worth buying. Whether your eyes are almond, hooded, deep-set, or something else, the same principles apply; you just adjust where things sit.
Why eye makeup, and what it can actually do
Let’s set aside the “windows to your soul” line for a moment. The practical version: your eye area is one of the only places on your face where a little color and a little shadow change how the whole look reads. Eyeshadow can make your eyes appear bigger, smaller, rounder, or more almond. Liner can lift a droopy outer corner or open up a hooded eye. Mascara does more for “do you look tired” than almost anything else. You’re not hiding anything — you’re editing a photo that’s already there.
And there’s no prerequisite. You don’t need “captivating eyes” to start. Everyone begins from their own eyelid, and the techniques just help you work with what you’ve got.
The four looks people actually wear
You don’t need twenty routines. You need a few that cover most of your life, and these are the ones that do.
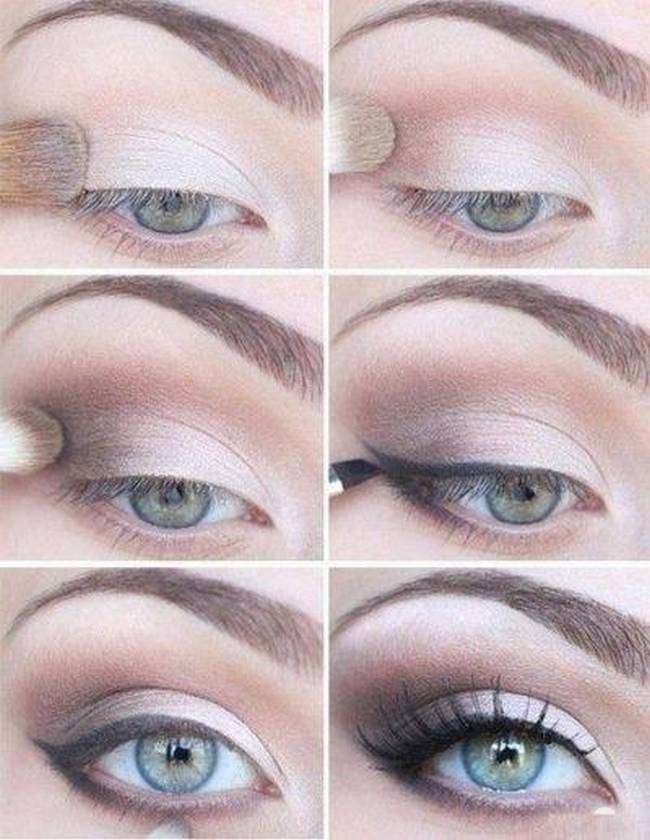
The natural look. Your everyday, “I woke up like this” look, and the one to master first. Neutral shadows, a thin line, a coat of mascara. The goal is enhancement, not transformation — you should still look like yourself, just brighter. It suits work, daytime, low-makeup days, and anyone learning who wants to practice without a full face of drama.
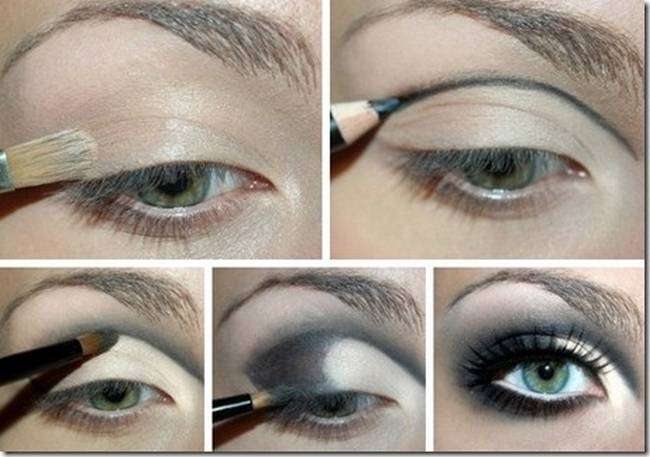
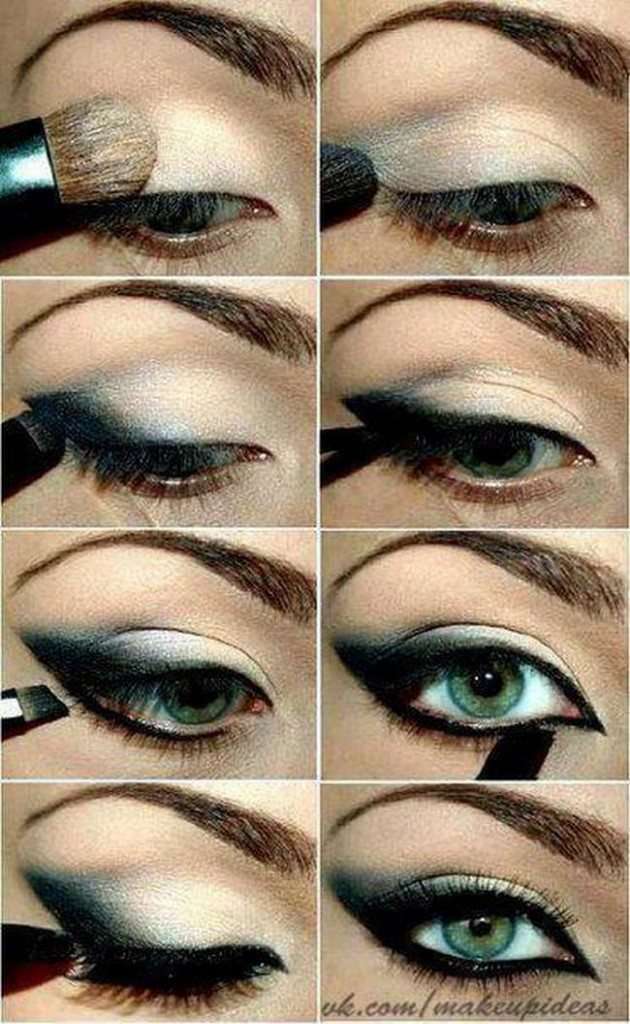
The smokey eye. The most asked-about look, and more versatile than its reputation. It’s just shadow blended hard until there are no edges, built from light to dark. It flatters almost every eye shape and color, and you can dial it from “a hint of brown for evening” to “full black-and-gray glamour.” The skill it teaches — blending — is the same skill every other look needs, so practice it often.
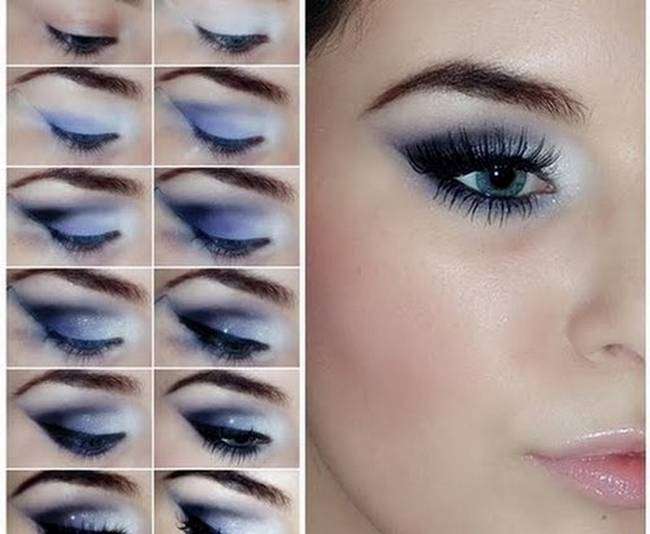
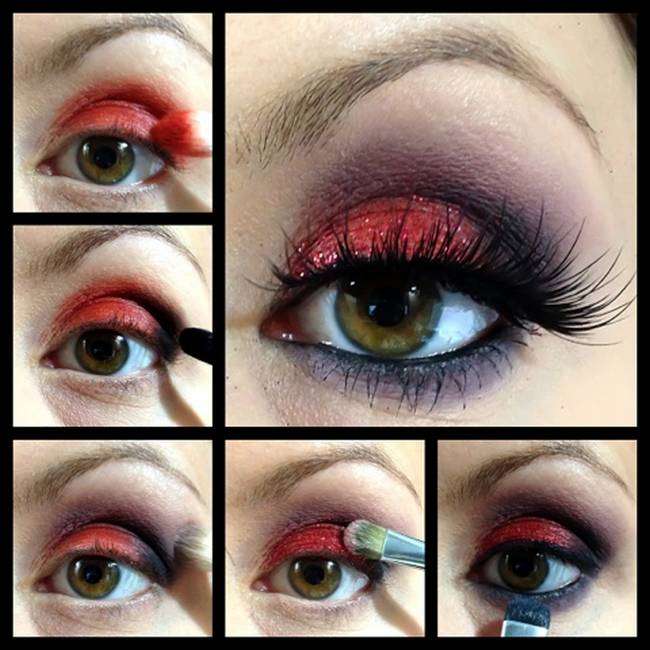
The colorful look. When you want to actually be seen. A pop of blue, green, purple, or something graphic. This is the playful, creative end of eye makeup, great for nights out, festivals, or when you just feel like it. The trick with color is the same as with shadow: blend the edges so it looks intentional, not messy.
The formal look. Weddings, events, anything where you want to look polished and a little glamorous. Think cut creases, shimmer on the lid, a clean wing. It reads “dressed up” without being heavy, and there’s a version for fair to deep skin tones.
The textual guide: how to apply eye makeup step by step
This is the core technique behind most of the looks above — a neutral base, a little depth, liner, mascara. Learn it once and the styles are just variations on top.
- Prime your lids. Push a pea-sized amount of eyeshadow primer up and over the lid, down over the brow bone, and blend. This is the step people skip, and it’s exactly why their shadow creases and fades by noon. Primer gives shadow something to grip and roughly doubles how long it lasts.
- Set the primer (optional but worth it). If your lids are oily, dust a touch of translucent or skin-toned powder over the primer so nothing slides. If they’re dry, skip it.
- Apply a base shade. A light, neutral shadow all over the lid and just under the brow. This evens out the color of your lid so the darker shades don’t look streaky, and it gives you a canvas to blend from.
- Work the crease. A medium brown or taupe on a fluffy brush, applied in the crease with back-and-forth “windshield wiper” motions, then swung in small circles to diffuse. This is where you build depth. Start light, add more slowly — you can always add, you can’t easily take away.
- Add depth to the outer corner. A darker brown (or black for a smokey eye) on a smaller brush, concentrated on the outer V and blended into the crease and along the outer lash line. This is what gives the eye shape and dimension. A light sweep along the lower lash line ties it together.
- Brighten the inner corner and center of the lid. A shimmer or satin shade on the inner corner and the middle of the lid. This throws light forward and makes the eyes look open and awake — the single biggest “you look rested” trick there is.
- Line the lash line. A thin line of pencil or liquid along the upper lash line. For a lifted, open look, keep it close to the lashes and add a small wing at the outer corner. If your eyes are hooded or you’re learning, a soft smudged line is more forgiving than a sharp wing.
- Clean up the fallout. Before mascara and finishing, wipe any shadow specks from under your eyes with a q-tip or cotton pad dipped in makeup remover. Do this early, or the specks mix with your mascara and you’ll have raccoon eyes by lunch.
- Curl the lashes and apply mascara. Curl first, then mascara, one coat at a time, letting each set. Upper and lower. Two thin coats beat one heavy one — heavy coats are how you get clumps.
- Optional: false lashes. If you want more drama, trim the band to fit your eye (cut from the outer end, not the middle), glue the band, and wait ~30 seconds until the glue is tacky — this is the step most guides skip and it’s what stops the lash from sliding. Settle them close to your lash line with tweezers or your fingers and hold.
- Set it. A light mist of setting spray over the whole face locks everything in. For the eyes specifically, it helps the shadow and liner hold through the day or night.
Visual guide: 20 eye makeup looks

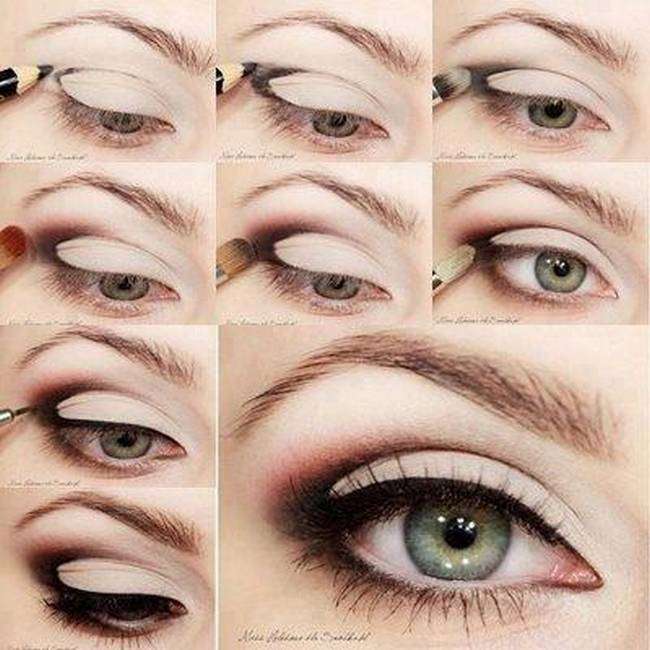


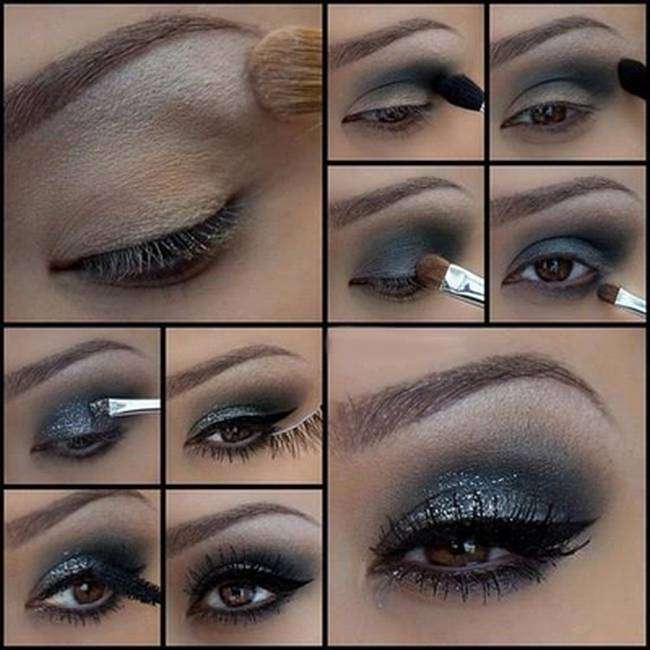
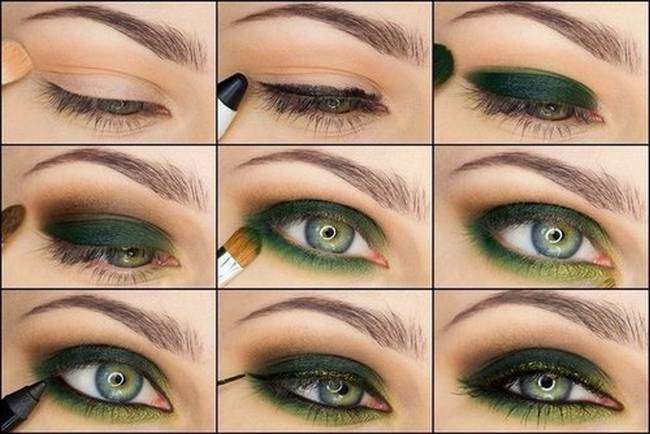


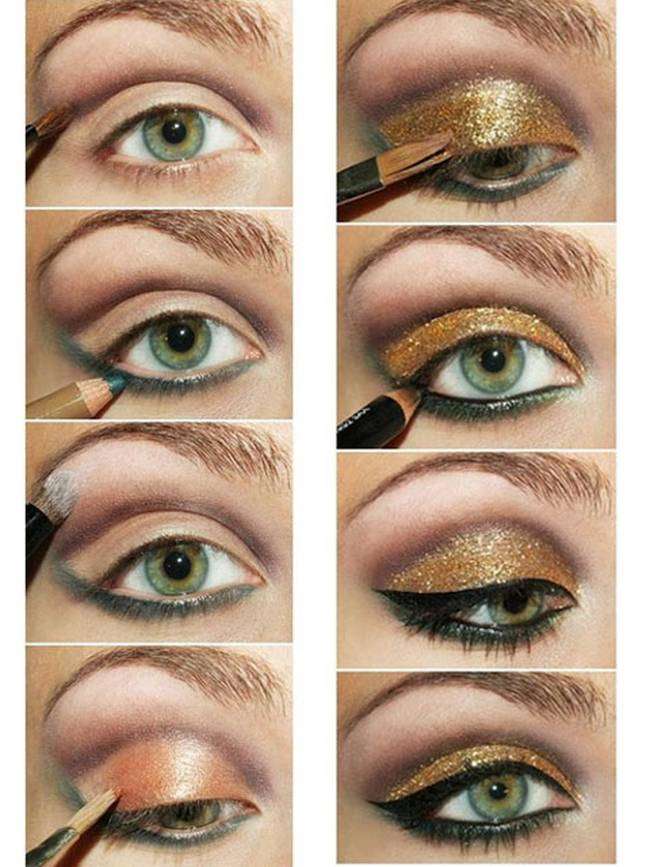
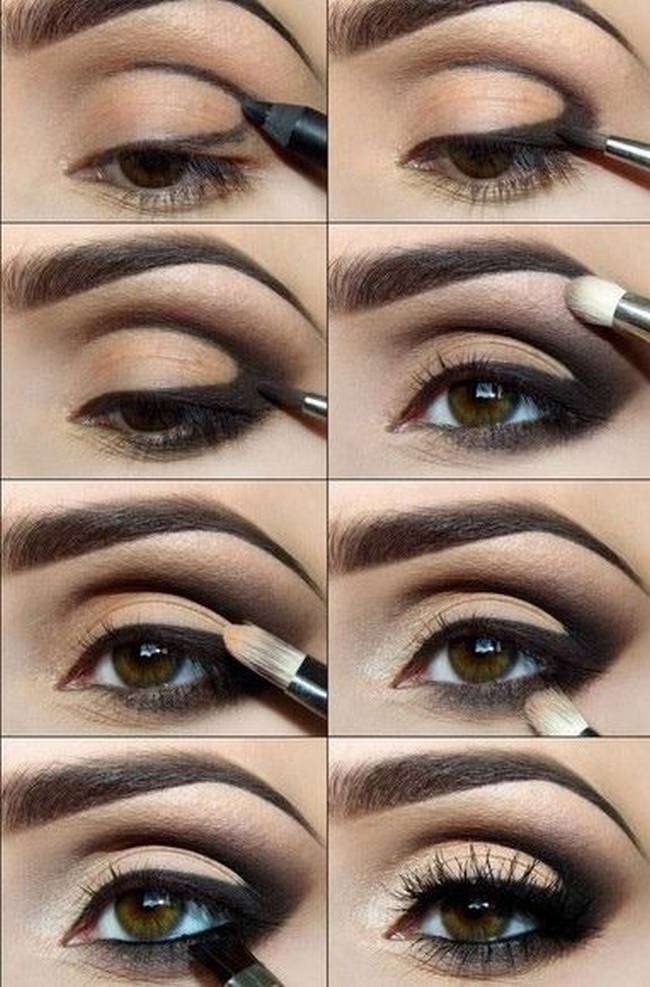
z

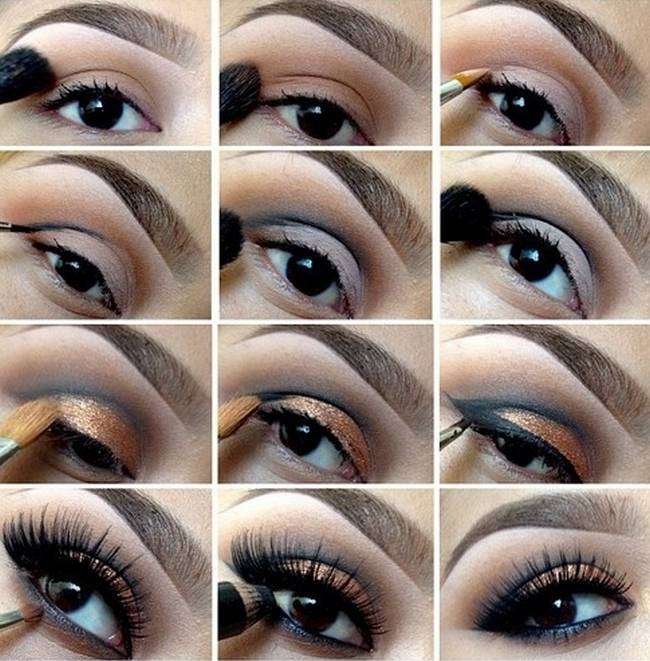
Recommended tools
You don’t need all of these on day one. Start with primer, a couple of brushes, liner, and mascara, then add as the looks demand it.
- Eyeshadow primer: gives shadow something to grip and stops it creasing. (This is the one thing the original list had twice — “Eye Primer or Base” is the same product.)
- Eyeshadow brushes: a puffy blending brush for the crease, a denser packer for the lid, and a smudger for smoky lines.
- Eyeshadow palette: a neutral range (whites, taupes, browns) covers most looks; go colorful only when you want to.
- Eyeliner: pencil for soft, smudgable, beginner-friendly lines; liquid for a crisp wing.
- Mascara: length and volume. Two thin coats, not one heavy one.
- Eyelash curler: opens the eye instantly and makes mascara work better.
- False lashes: for drama or to disguise a sparse lash line. Tweezers help place them.
- Eyebrow pencil/powder, brush, and gel: fill sparse spots, then groom and hold.
- Concealer: for under-eye circles and for cleaning up messy liner — a dense brush or fingertip dabs it over the edge.
- Highlighter: a little on the inner corner and under the brow bone for an open, awake look.
- Blending sponge: for concealer and under-eye, not eyeshadow — brushes do the shadow blending.
- Eye makeup remover, q-tips, and cotton pads: for cleanup and corrections. Wipes work in a pinch.
- Setting spray: locks the whole face, including the eye makeup, in for the day or night.