There’s something almost criminal about paying full price for a pair of sneakers you’re going to ruin anyway. So why not ruin them on purpose?
A plain pair of white kicks is basically a blank canvas, and the internet is full of people who’ve worked out how to turn that canvas into something else entirely — glitter, galaxies, maps, studs, shoes that look like they walked out of a 1950s diner. Ten of the best are below. Each one is simpler than it looks, and the original creators are credited at the foot of every section, so click through if you want the full walkthrough. Enjoy.
1. Mod Podge Fabric-Covered Sneakers
This is the one for when you’ve got an old shirt or a scrap of fabric you can’t quite throw away. Clean the sneakers first — really clean them, so nothing greasy sits between the shoe and the fabric — then cut the material into panels that follow the shape of each shoe. Brush Mod Podge on the back of the fabric, lay it down, and smooth it flat from the center outward so you don’t trap air bubbles. Trim the edges, let it cure completely, and you’ve got shoes no one else has. Take your time on the smooth-out; that’s the whole difference between “handmade” and “I tried.”


Source: http://handmadehappyhour.com/2013/06/18/diy-fabric-covered-sneakers-with-mod-podge/
2. Sneakers with Stripes and Sequins
If plain is boring, this is your move. Mask off the stripes you want with painter’s tape — press the edges down hard so paint doesn’t creep underneath — then fill them in with fabric paint. Peel the tape while the paint is still slightly tacky and you get edges crisp enough to feel unfair. Once it’s dry, glue sequins along the lines or scatter them for something flashier. Seal it if you want them to survive a rain, because unsealed sequins have a way of going on a migration.

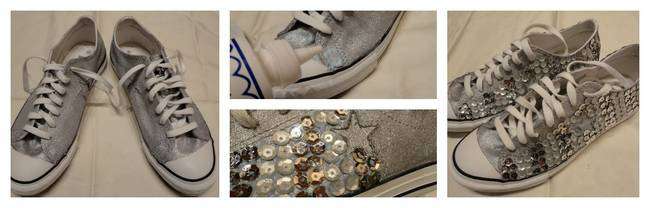
Source: http://www.stripesandsequins.com/2011/10/diy-striped-sequined-sneakers-plus-win-40-to-target.html
3. Shoes with a Map Design
The best version of this picks a map that actually means something to you — the neighborhood you grew up in, a city a trip took you to, or somewhere you’re still hoping to go. Cut out the sections you want, decoupage them on with Mod Podge, and smooth them down like you’re wrapping a gift. Seal it afterward if they’ll see real weather. It’s a small way to carry a favorite place around on your feet.

Source: http://www.cutoutandkeep.net/projects/map-shoes
4. Glitter Sneaker
Full disclosure: glitter sneakers are a commitment. They shed. You’ll find them on your couch, in your car, occasionally on your dog. But if you’re in it for the sparkle, do it right. Brush fabric glue over the whole shoe, blanket it in glitter, shake off the loose bits once it’s dry, and — this part is non-negotiable — seal it with a clear topcoat or you’ll be picking glitter off your laces for weeks. Pick fine glitter over coarse; it reads as glow, not as a craft project.

5. Sneakers Inspired by Christmas Lights
A slightly quirkier holiday option. Paint the shoe a dark base first — the lights only pop against something black — then draw the bulbs and string with fabric markers or paint. Add tiny highlights where the “bulbs” would glow, and don’t stress about perfection; a little wobble is what makes it look hand-drawn and charming. Great for wearing the week of December 25th and then pretending they’re just decorative.

Source: http://www.dreamalittlebigger.com/post/christmas-lights-inspired-sneakers.html
6. Sneakers with Studs
This is the shortcut to making plain sneakers look like they cost a lot more and came with an attitude. Decide where the edge goes — a row along the side, a frame around the lace area, a scattered pattern — then push each stud’s prongs through from the inside and fold them flat against the inner sole. Work in small sections and check that they’re snug as you go; a loose stud is a stud waiting to catch on your socks and rip right out.

7. Converse Painted with a Galaxy Design
The galaxy shoe is basically a rite of passage at this point, and for good reason — it just works. Start with a dark base, black or navy, and stipple on blues, purples, and pinks with a sponge so the colors blend into that cloudy nebula look. Flick tiny dots of white or silver on top for stars once the base is dry. If it looks too busy, step back and leave room; galaxies are mostly empty, dark sky with a scattering of light.

Source: http://www.sparklecollective.com/galaxy-painted-converse/
8. Two-Tone Sneaks
Two-tone is all about the tape. Pick two colors you actually like wearing together, mask off the half you want to keep original, and paint the exposed side in one clean coat. Peel the tape, then do the other side. The whole look lives or dies on how sharp your masked edges are, so press the tape down and use a light hand with the paint so it doesn’t bleed under the line. Clean, geometric, and surprisingly hard to mess up.
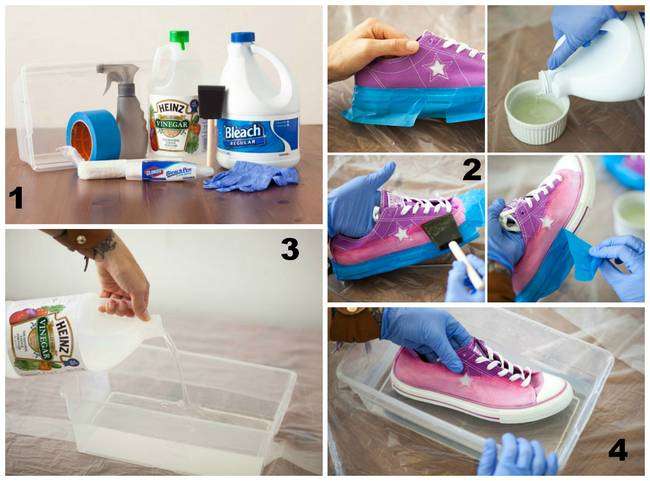

Source: http://www.brit.co/bleach-converse/
9. Galaxy Print Sneaker
Yeah, this one’s a cousin of #7 — same cosmic idea, different execution. If the sponge-blended galaxy didn’t click, this is the version to try: dark base, swirls of blue, purple, and pink built up with a small brush or sponge, then white or silver dots for the stars, sealed on top. Worth doing separately because the brush method gives you more control over where the swirls go. Just don’t do both in the same week or you’ll end up with two nearly identical pairs.
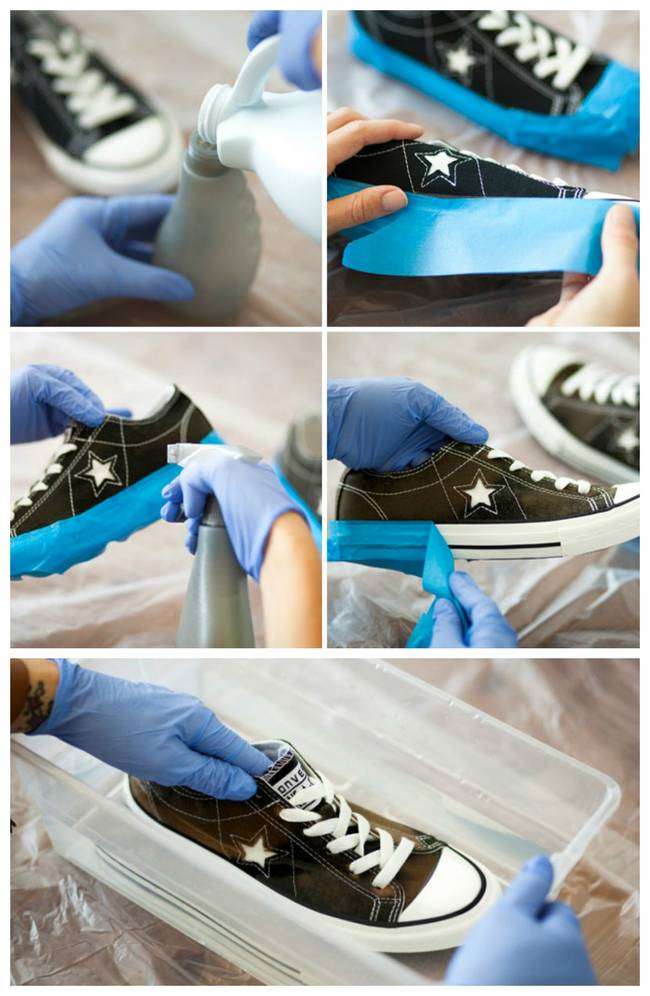

Source: http://www.brit.co/bleach-converse/
10. Saddle Shoes
The retro move. Saddle shoes are that classic two-tone look with a contrasting “saddle” over the middle of the foot — very 1950s, very diner. Pick a body color and a contrasting saddle color, mask the saddle shape carefully (that curve is the whole thing), paint it on, and peel once dry. If the edges look rough, go over them with a fine brush dipped in the matching color. It’s an easy way to make plain shoes look intentional and vintage.
