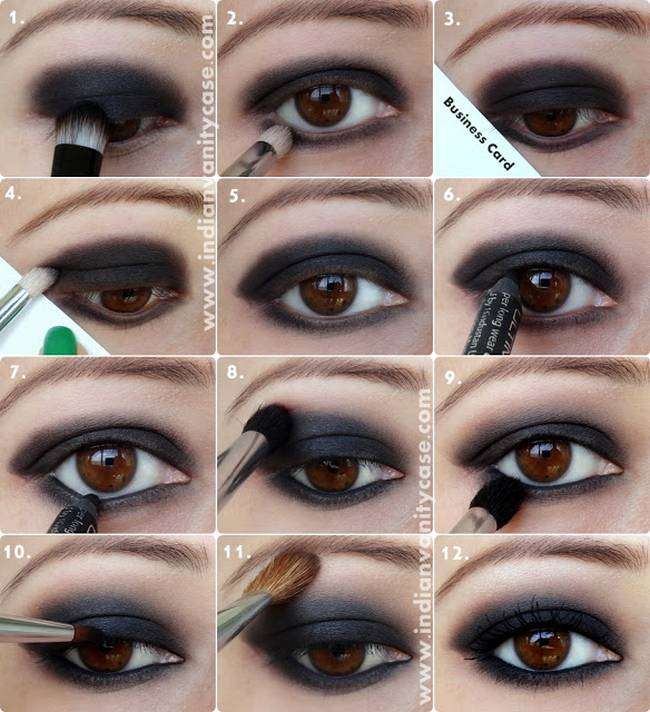
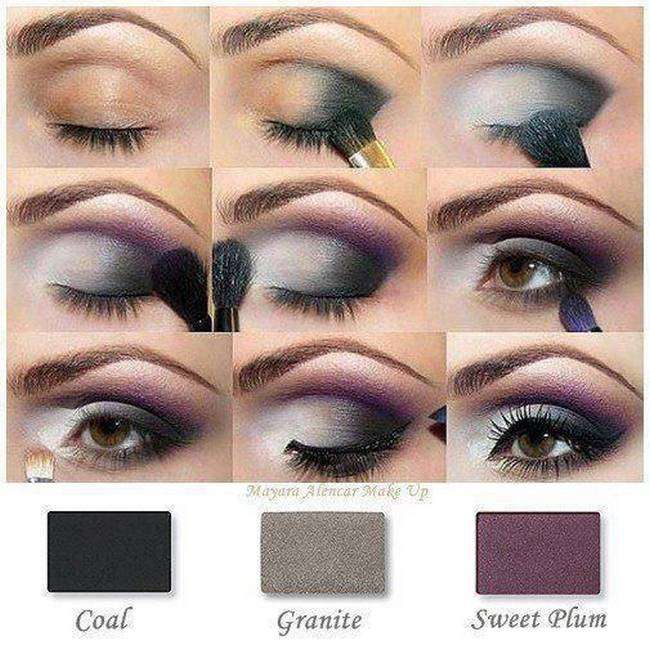
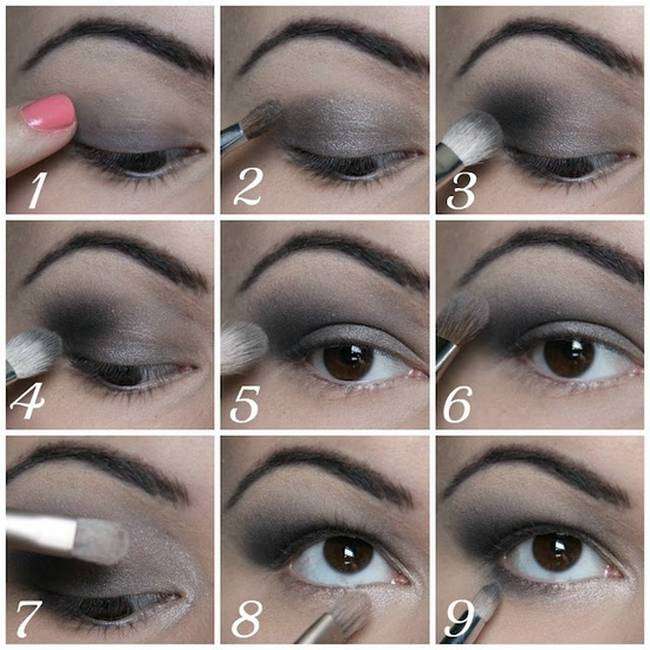
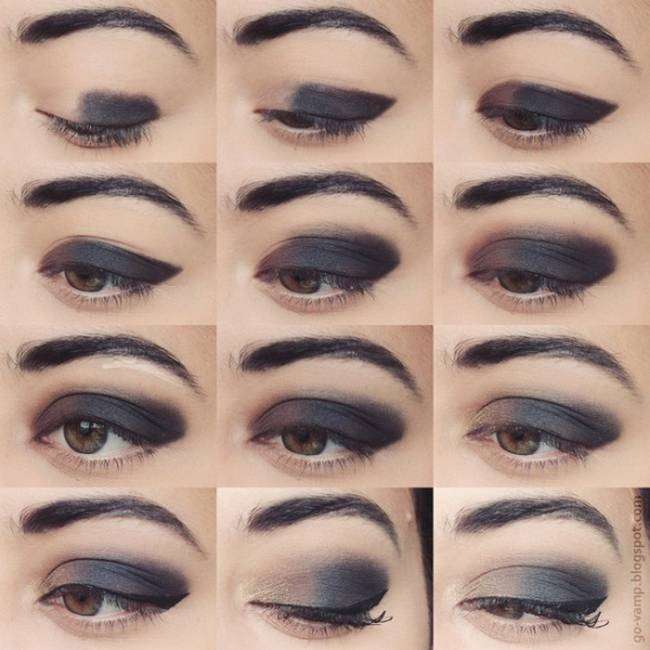
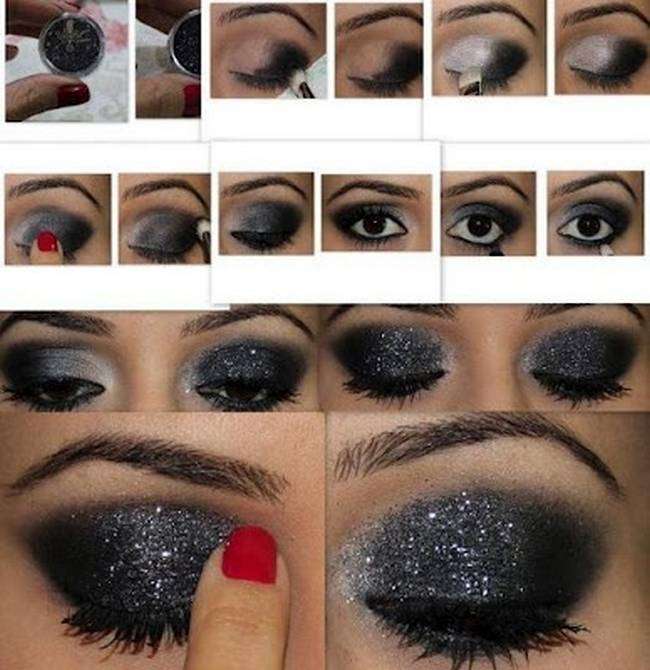
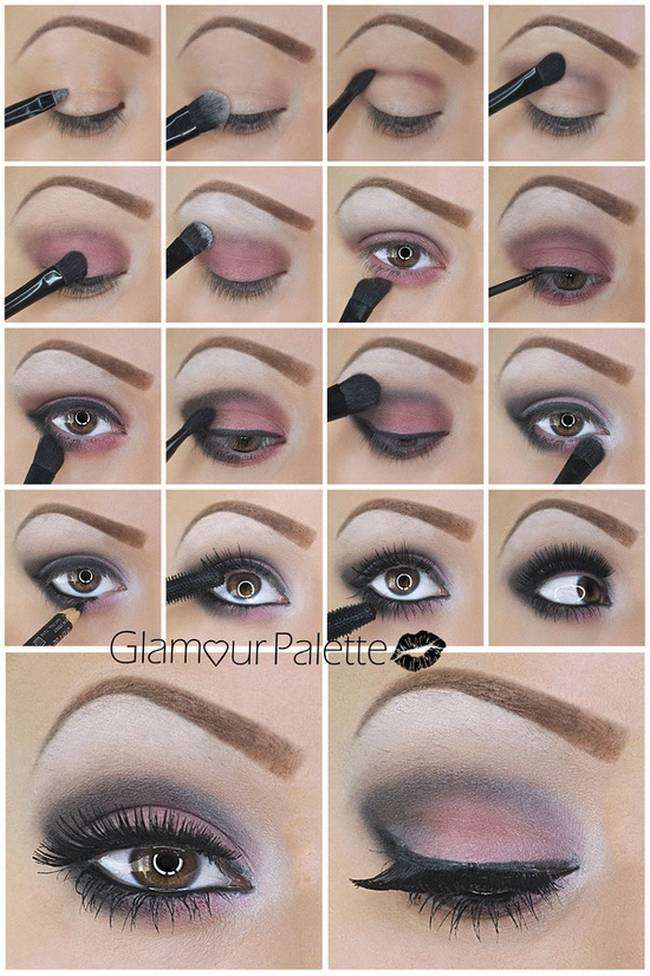
The smokey eye has a reputation for being hard, and honestly, half the time people make it hard on themselves. The version you see on blogs — crisp, graceful, “alluring” — is usually a heavily filtered photo of someone who’s done this a hundred times. The real thing is simpler and more forgiving than it looks, and it comes down to one idea.
Here’s the idea: a smokey eye is a gradient. The pigment is darkest right at the lash line and fades upward and outward until there’s no edge at all. “Smokey” isn’t a color — it’s a finish. It means smudged, diffused, no hard lines. Get that gradient right and your eyes look deeper, your lashes look thicker, and the look reads as elegant instead of “I stayed up late and made a mess.” Get it wrong — hard lines, too much product too fast — and you look like you got poked in the eye.
So this guide is less about one specific look and more about the one skill everything else builds on: blending. Learn that, and you can do a smokey eye in black, in brown, in color, soft or dramatic. Let’s start with what you’ll need.
What you actually need (and what you can skip)
You don’t need a whole drawer of products. Here’s the short list, and why each one matters:
- An eyeshadow palette with matte neutrals. You need at least three matte shades: one to sit just below your skin tone, one medium (taupe, brown, or charcoal), and one very dark (black or near-black). Skip the shimmer for the smoke — shimmer reads as shine, and a smokey eye is about depth, not glitter. A matte palette is all you need to start.
- A blending brush. This is the domed, fluffy one you swirl in the crease. It does most of the work, because blending is the whole trick. Don’t skip to a flat brush thinking you’re being faster — you’re not.
- A flat patting brush. For pressing the medium shade onto the lid itself.
- A small pencil or defining brush. For the outer corner and lower lash line, and for packing the dark shade close to the lashes.
- A smudge brush (or a cotton swab). For softening the liner.
- Eye primer. Non-negotiable for this look. It stops the shadow from creasing into lines by midday and makes matte pigment actually show up.
- A black liner. Gel or pencil, your call — both work. Gel gives the most intense, smudgeable line; pencil is friendlier for beginners.
- Volumizing mascara. The finish.
Optionally: a makeup remover on a q-tip or angled brush to “clean up” and sharpen the shape at the end. That one step is what separates “polished” from “smudged by accident.”
A quick note on your eye shape
The steps that follow are the classic technique, but eyes aren’t all shaped the same, and ignoring that is the fastest way to a bad result.
- Almond eyes: the easy default. Use the technique as written.
- Hooded eyes: the skin folds over your mobile lid, so if you put the dark shade up high in your crease it’ll disappear when your eyes are open. Keep the darkest pigment closer to the lash line and blend gently upward; the shape will still show.
- Monolids: there’s no crease to grab the color, so primer is essential, set the lid with a little powder, and you may need a touch more pigment. Pat, don’t swipe.
- Round eyes: the goal is to elongate, so extend the smoke outward toward the temple rather than straight up.
If you’re not sure which you are, the hooded and almond notes above cover most people. When in doubt, keep the darkness low and blend outward.
Prep: the part people rush
A smokey eye lives or dies on the lid you’re working on, so prep it.
Apply a pea-sized amount of eye primer all the way up to the brow bone, and blend it in with the back of your finger. Two jobs: it gives the pigment something to grip so it lasts and reads vibrant, and it creates an even, slightly tacky surface so you can blend without the color patching. Let it set for ten seconds — if it’s still wet, your shadow will slide.
Optional but useful: dust a little setting powder over the lid after primer. This “sets” a slippery lid into something you can blend into, and it lets you soften mistakes later without pulling up product.
The steps (with the why behind each)
Work in natural light if you can, eyes open and looking straight ahead into a mirror. Start with less product than you think — shadow builds, and once it’s on it’s hard to take back. Here’s the order and why each move exists.
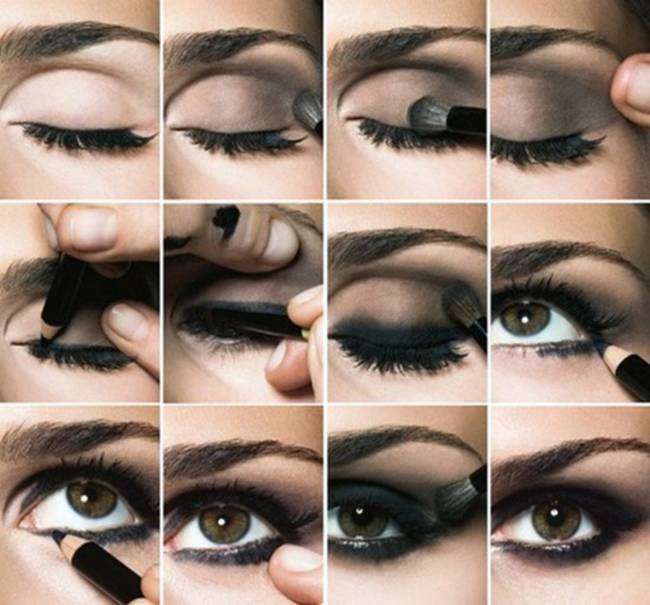
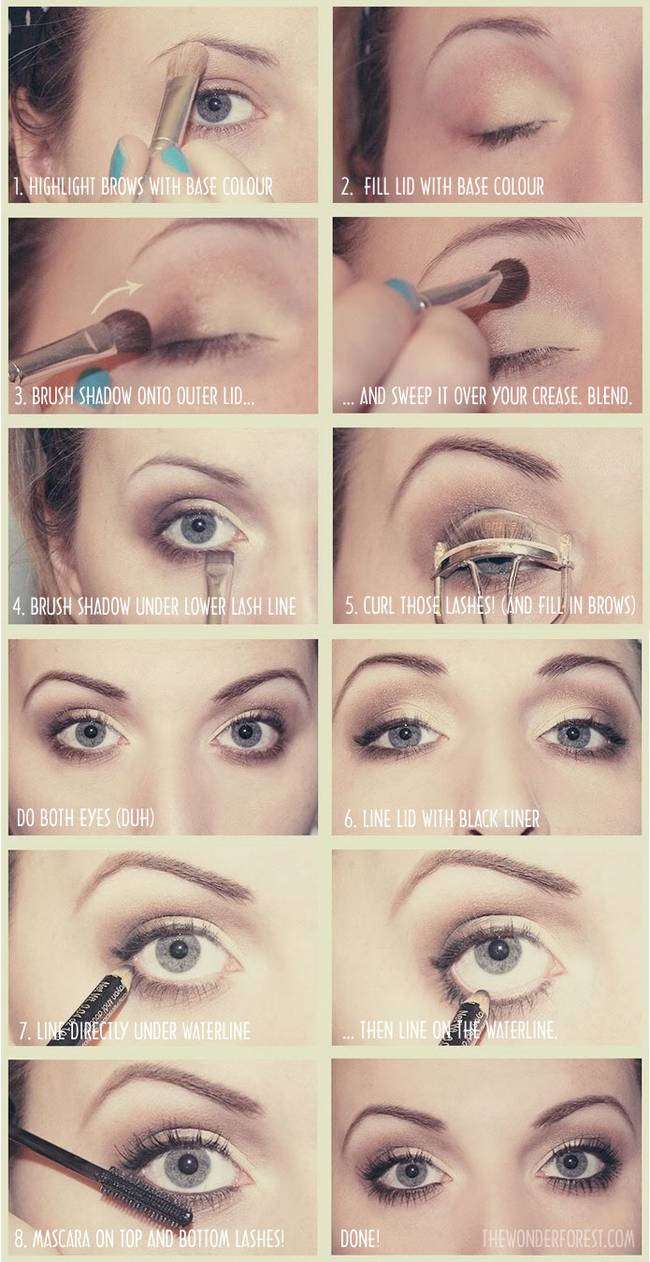
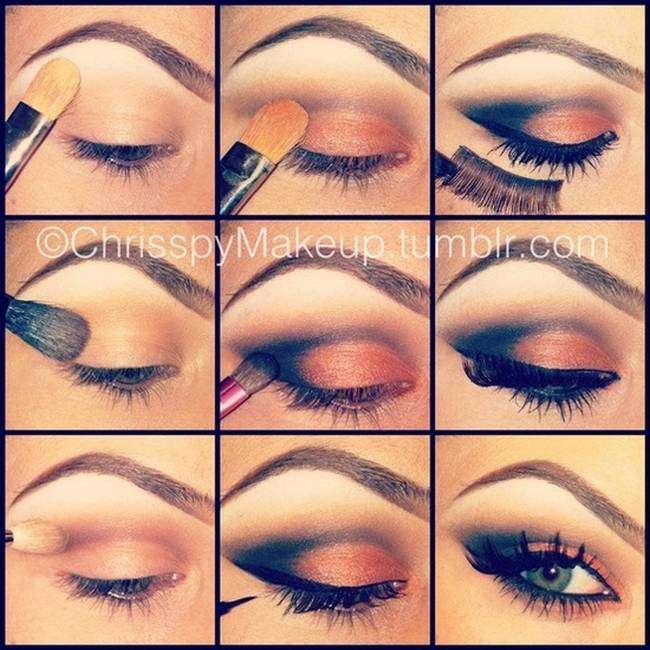
- Map the outer corner. With your blending brush and the medium-dark shade, draw a backward “V” in the outer corner — from the outer third of the lid back toward the temple, and down along the lower outer lash line. This is where you’ll concentrate darkness, and it’s what elongates and lifts the eye. Put a little too much here at first; you’re blending it out anyway.
- Work the crease. Switch to the medium shade (or the same one, lighter on the brush) and swirl it into your crease using small circular motions, the brush moving in and out like you’re mixing paint. The crease is where you add depth without adding a line. If you can see a hard band of color, you haven’t blended it enough.
- Pat the lid. With a flat brush and the medium shade, press the color across the mobile lid. Patting — not swiping — lets the pigment sit on top where you want it. Blend the lower edge into the crease color so there’s no seam.
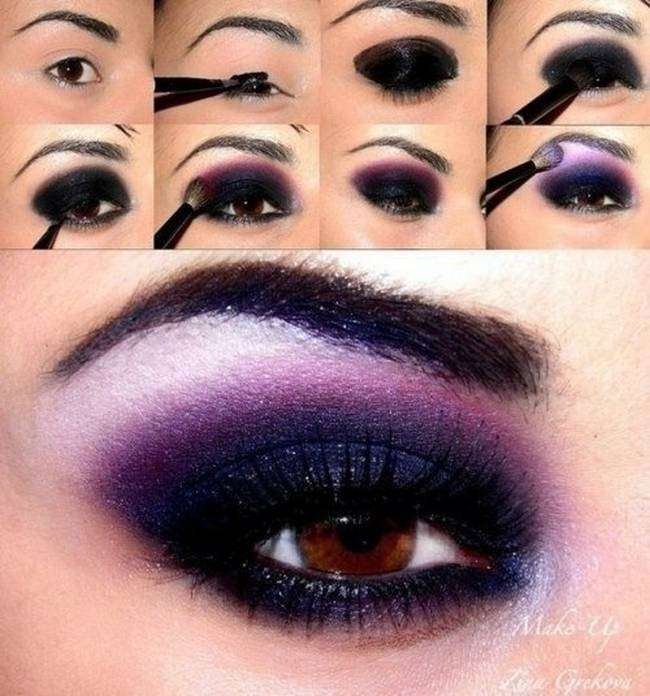
- Darken the lash line. Now the very dark shade. Using a small defining brush, pack it as close to the upper lashes as you can, then blend just the top edge into the crease. The darkest color belongs lowest, right at the lashes, because that’s what reads as definition and makes the lash line look full.
- Smudge the liner. Line your upper lash line with the black liner, going a little thicker toward the outer corner, then smudge it with a smudge brush or cotton swab until it’s soft, not sharp. This liner is the spine of the smoke — it’s what makes the lash line look thick and the eye defined. You can also tightline (draw along the upper waterline, between the lashes) to fill gaps and make lashes look denser.
- Brighten the inner corner. Press a light, matte (or subtle shimmer) shade into the inner corner and just under the front of the brow. This opens the eye up and keeps the look from reading as a heavy, bruised ring. It’s the contrast that makes the smoke look intentional rather than accidental.
- Blend everything. Go back over the whole thing with a clean blending brush, no product on it, and swirl until every edge is gone. This is the step that makes or breaks the look. There should be no lines you can see — only a smooth fade from dark at the base to nothing at the top.
- Mascara. A few coats of volumizing mascara on the upper and lower lashes. This ties the liner, the smoke, and the eye together and opens the eye open.
The one step that makes it look done
Dip a q-tip or a flat brush in eye remover and run it just under the lower lash line and along the outer edge, cleaning up any fallout and giving the shape a clean sweep outward. This is what turns “smudged” into “intentional smoke.” Wipe the brush clean between passes. If you want a sharper wing, this is where you define it.
Variations once you’ve got the basics
- Soft neutral smokey: skip the black, stay in browns and taupes. Same technique, far gentler. Great for daytime and the office.
- Classic black: the full thing — black liner, black shadow, smudged, dramatic. Evening, going out.
- Colored smokey: keep a dark neutral as the base and outer corner, then add your color (blue, green, purple, etc.) in the crease and blend. The dark base keeps any color looking smoky instead of clownish.
- Double smokey: apply the same gradient to the lower lash line so top and bottom balance. Best on non-round eyes.
The mistakes that actually happen
- Starting too dark. Build in layers. A light first coat you can blend beats a heavy one you can’t.
- Hard lines. That’s not smokey, that’s a shelf. Keep blending; a clean brush does the fixing.
- Shimmer on the smoke. Reserve shimmer for the inner corner or a touch on the center of the lid. Matte is what makes the depth.
- No primer. Expect creasing and fading by afternoon. Primer is the difference between six hours and sixty minutes.
- Ignoring the lower lash line. A smokey eye with only a top line looks unfinished. Soft the liner down the bottom too.
- Asymmetry. Step back and compare both eyes as you go, not just at the end.
One last thing
The smokey eye is a blending exercise dressed up as makeup. Your first attempt won’t be perfect, and that’s normal — the skill is in the hand and the eye, and it takes a few tries to trust how much product to pick up. Start with browns, go slow, blend until you can’t find an edge, and treat the cleanup step as part of the look, not an afterthought. Once the gradient feels natural, you can do it in your sleep, in any color, and make it last all night.